Choose your modular framework
Selecting the right SDK determines how much of the blockchain you actually have to build. You can start from scratch, but using an existing framework like Cosmos SDK, Substrate, or the OP Stack saves months of development time. The best choice depends on whether you prioritize EVM compatibility, native interoperability, or custom consensus logic.
| Framework | Language | EVM Compatible | Interoperability |
|---|---|---|---|
| Cosmos SDK | Go | No (via IBC) | High (IBC) |
| Substrate | Rust | No (via pallets) | Medium (XCM) |
| OP Stack | Solidity/Go | Yes | Medium (L2) |
Cosmos SDK is the standard for custom app chains that need to talk to other chains out of the box. It uses Go, which is fast and stable, but requires you to build your own EVM layer if you want Ethereum smart contract compatibility. Substrate offers maximum flexibility with Rust, allowing you to design a completely unique consensus mechanism, though it has a steeper learning curve. The OP Stack is the best path if your app chain needs to be an Ethereum Layer 2, inheriting its security and user base immediately.

Your decision should hinge on your team's existing expertise and your users' expectations. If your users are already on Ethereum, the OP Stack reduces friction. If you are building a specialized data chain that needs to share state with other independent chains, Cosmos SDK is the natural fit. Avoid building a custom runtime from scratch unless you have a specific consensus requirement that no existing framework can satisfy.
Define consensus and security model
Your custom app chain’s consensus mechanism determines who validates transactions and how the network reaches agreement. This choice sets the baseline for decentralization, finality speed, and economic security. You generally choose between Proof of Stake (PoS) and Proof of Authority (PoA), each serving different operational needs.
Choose between PoS and PoA
Proof of Stake requires validators to lock up native tokens as collateral. This model aligns economic incentives with network health, as validators risk slashing their stake for malicious behavior. It is the standard for public-facing app chains that prioritize censorship resistance and open participation. However, it requires a robust tokenomics design to prevent centralization of stake among a few large holders.
Proof of Authority relies on a small set of identified, reputable validators. Transactions finalize faster because there is less coordination overhead, and governance is simpler. This model suits enterprise or private app chains where identity verification is mandatory and speed outweighs the need for open decentralization. The trade-off is lower resistance to collusion among the validator set.
Decide on shared vs. independent security
Once you pick a consensus mechanism, you must determine how your app chain secures its state. Independent security means your chain runs its own validator set and stakes its own native token. This provides maximum autonomy but requires you to bootstrap a sufficient security budget from scratch, which is difficult for new chains.
Shared security allows your app chain to inherit security from a larger parent chain or a modular layer. For example, you might use a shared sequencer or a common settlement layer. This reduces the cost of launching a custom app chain and leverages the existing trust of the parent network. However, it introduces dependency risks; if the parent chain experiences downtime or governance issues, your app chain is affected.
For most builders starting in 2026, shared security offers a faster path to production. It allows you to focus on application-specific features rather than managing a large validator set. If you require absolute sovereignty and have the capital to attract validators, independent security remains the gold standard for long-term resilience.
Configure execution and data layers
Setting up the execution and data availability layers is where you define how your custom app chains process transactions and store data. This configuration determines the chain's speed, cost, and security model. You will need to select a Virtual Machine (VM) for execution and choose a Data Availability (DA) layer for settlement.

Choose the execution environment that matches your application's needs. EVM-compatible VMs are ideal if you want to leverage the existing Ethereum developer ecosystem and tooling. For higher performance or different language support, consider alternatives like Cosmos SDK or Substrate. The VM dictates how smart contracts are executed and validated.
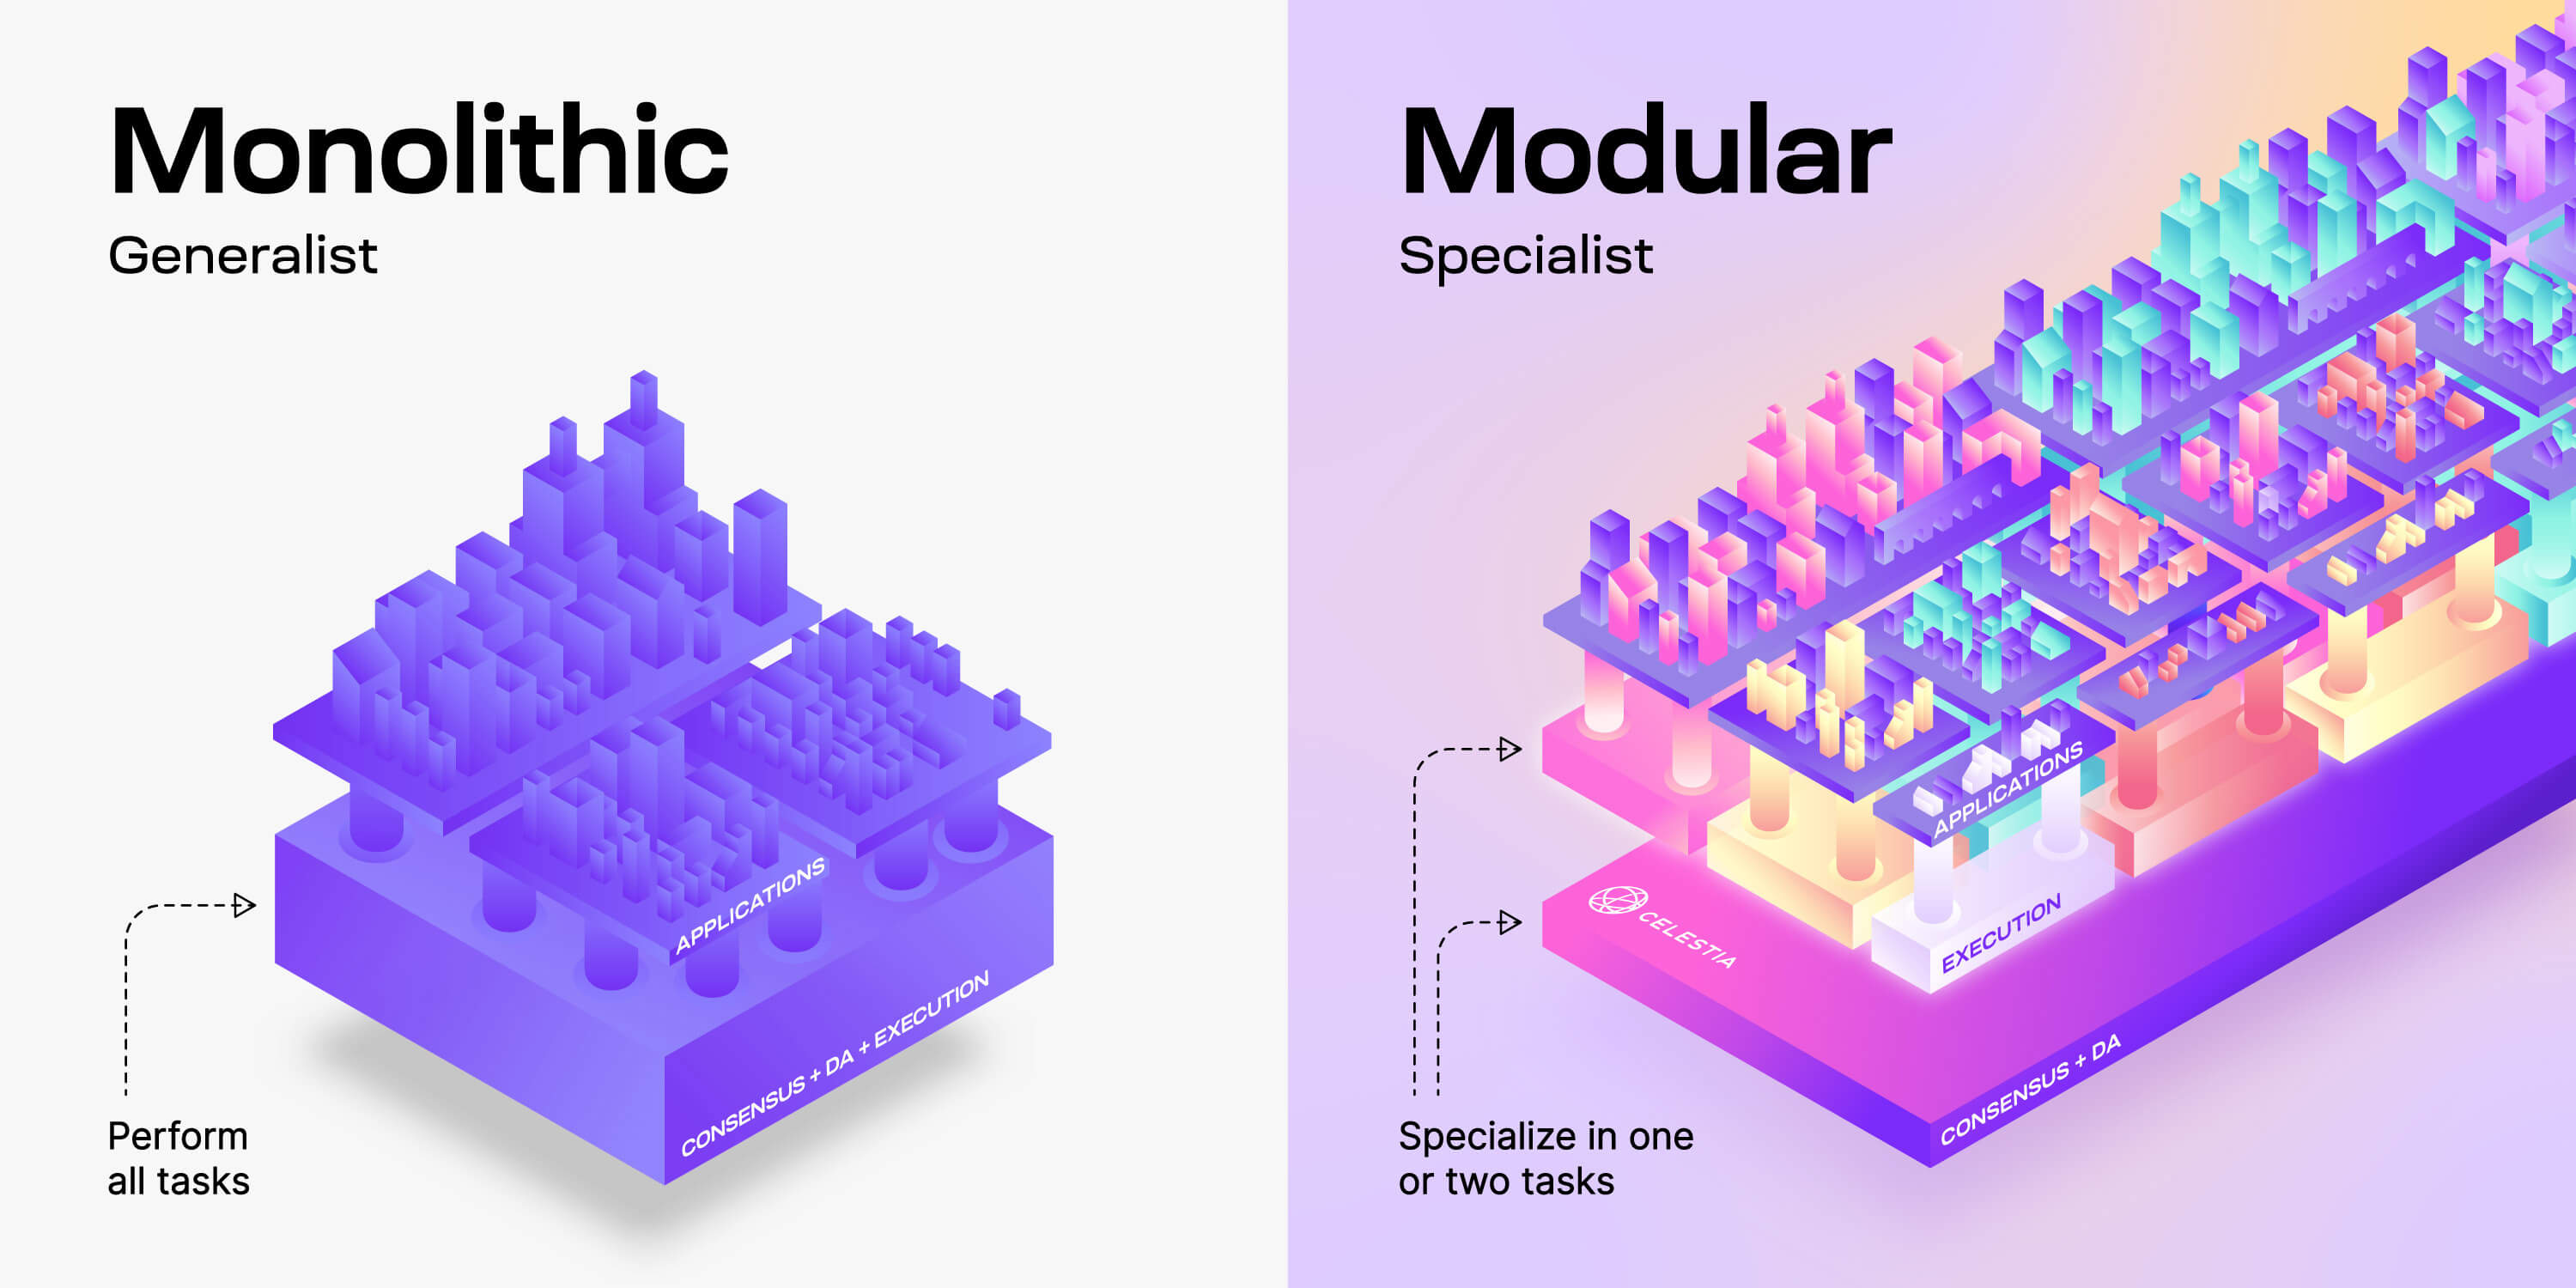
Decide where your chain's transaction data will be stored. In a modular architecture, you offload data storage to a dedicated DA layer like Celestia or EigenDA. This separation allows your custom app chains to scale independently of the consensus layer, reducing costs and improving throughput compared to monolithic designs.
Set up the consensus mechanism that agrees on the order of transactions. You can use Tendermint BFT for fast finality or integrate with the DA layer's blobstream for cryptographic data availability proofs. This step ensures that your chain reaches a definitive state on transactions without relying solely on the underlying base layer.
Deploy a local testnet to verify that your execution and data layers communicate correctly. Use tools like dymint or celestia-node to simulate block production and data commitment. This validation step prevents configuration errors before you launch your custom app chains on mainnet.
Deploy and test the network
Before launching your custom app chain to the public, you must ensure the node infrastructure is stable and the consensus mechanism functions as intended. This phase involves spinning up your validator and full nodes, configuring the genesis state, and running integration tests to catch critical bugs. Skipping this step often leads to chain forks or lost funds during mainnet.
1. Initialize the genesis configuration
Start by generating the genesis block that defines your chain’s initial state. This includes setting the initial validators, token distribution, and runtime parameters. Ensure your genesis.json or equivalent configuration file accurately reflects your custom runtime logic. Any mismatch here will cause nodes to reject blocks immediately.
2. Spin up local validator nodes
Launch your validator nodes locally or on a testnet environment. Use the same binary and configuration files you plan to use for mainnet to ensure consistency. Monitor the logs for any consensus errors or peer connection failures. If nodes fail to sync, check your network ports and firewall settings before proceeding.
3. Run integration tests
Execute comprehensive integration tests to verify that your custom runtime logic interacts correctly with the underlying substrate or framework. Test transaction inclusion, block finalization, and state transitions. Use tools like cargo test for unit tests and custom scripts for end-to-end validation. This step ensures your app chain behaves predictably under load.
4. Verify node synchronization
Once tests pass, verify that multiple nodes can synchronize with each other. Check that new blocks are being produced and finalized consistently across all validators. Use block explorers or RPC endpoints to confirm the chain height is advancing. This confirms your network is healthy and ready for external traffic.
5. Prepare for mainnet launch
After successful testing, finalize your deployment configuration. This includes setting up monitoring, alerting, and backup procedures for your validators. Ensure your node operators have the necessary access keys and security protocols in place. A smooth launch depends on rigorous preparation during this final check.
Common mistakes to avoid
Building custom app chains gives you full control, but that freedom often leads to preventable errors. Most projects fail not because of bad code, but because they ignore how their chain interacts with the broader ecosystem. Avoid these three pitfalls to keep your custom app chain functional and valuable.
Ignoring interoperability
A custom chain that cannot communicate with other networks isolates your users and liquidity. If your chain cannot bridge assets or share data with existing ecosystems, it becomes a walled garden with limited utility. Syndicate, for example, addresses this by allowing appchain developers to maintain full customization while still enabling composition with other chains Syndicate. Without interoperability, your custom app chain risks becoming a standalone experiment rather than a useful part of the blockchain landscape.
Poor tokenomics design
Tokenomics are not just about setting a price; they define the incentive structure for validators, users, and developers. If your custom app chain’s token has no clear utility or sustainable emission schedule, it will struggle to attract long-term participation. Design your token model to align the interests of all stakeholders, ensuring that holding or using the token provides tangible benefits to the network’s health.
Over-engineering the stack
It is tempting to build a custom app chain with every possible feature from day one. This complexity slows down development and introduces security risks. Start with the core functionality that solves your specific problem. Add features only when you have real user feedback. A simpler, stable custom app chain is far more valuable than a complex, buggy one that never launches.
Launch Checklist for Custom App Chains
Before pushing your custom app chain to mainnet, run through this final sequence. This ensures your infrastructure is stable and your users can actually interact with it.

-
Security Audit Complete: Have third-party auditors reviewed your smart contracts and validator logic? Do not skip this step for mainnet deployments.
-
Testnet Stress Test: Simulate peak traffic. Ensure your node infrastructure handles the load without freezing.
-
Explorer Integration: Verify that your chain is indexed on a block explorer (like Subscan or Etherscan) so users can track transactions.
-
Wallet Support: Confirm that major wallets (MetaMask, Keplr, etc.) can connect to your chain’s RPC endpoint.
-
Documentation Live: Ensure your developer docs explain how to bridge assets and call contracts.
A custom app chain is only as good as its accessibility. If users cannot see their transactions or fund their wallets, the chain is dead on arrival.
Frequently asked questions about custom app chains
What is a custom app chain?
A custom app chain is a specialized blockchain built to handle a specific task better than general-purpose networks. By dedicating resources to one use case, these chains deliver more reliable transaction fees and higher throughput for your application. They function like dedicated lanes on a highway rather than a shared public road.
How do custom app chains differ from Layer 2 solutions?
Layer 2 solutions scale existing blockchains by processing transactions off-chain before settling on the mainnet. Custom app chains are independent networks that may connect to a main chain but operate with their own consensus and security model. This independence allows developers to tailor economic and governance rules without being constrained by the base layer.
Are custom app chains secure?
Security depends on the framework and validator set you choose. Chains built with modular frameworks like Cosmos SDK or Polygon CDK can inherit security from a larger network or rely on a dedicated validator group. While they offer flexibility, they require careful configuration to avoid centralization risks that general-purpose chains often mitigate through sheer scale.
No comments yet. Be the first to share your thoughts!