Define the app chain scope
Before writing a single line of consensus code, you must determine if your application warrants its own Layer 1. The distinction between a shared Layer 2 and a dedicated app chain is not merely architectural; it is a fundamental trade-off between sovereignty and shared security.
A shared Layer 2, such as those built on Ethereum via optimistic or ZK rollups, offers immediate security by inheriting the base layer's validator set. This is cost-effective for applications with moderate throughput needs. However, it imposes rigid constraints. You inherit the base chain's gas token volatility, its transaction ordering rules, and its censorship resistance model. If your enterprise workload requires deterministic finality or specific data availability guarantees, a shared L2 may introduce unacceptable latency or complexity.
An app chain, defined as a blockchain exclusively designed to operate one specific application, provides this isolation. In 2026, infrastructure providers like Cosmos SDK-based frameworks and modular stacks (e.g., Celestia for data availability) have made launching these chains significantly faster. You are no longer building a blockchain from scratch; you are configuring a specialized node network.
This scope definition directly impacts your 2026 development roadmap. As blockchain hiring teams now expect full-stack delivery and comfort with modern wallet UX, an app chain allows you to customize the user experience and tokenomics specifically for your vertical. If your app relies on real-time personalization or complex AI-driven smart contracts, the predictable block times and custom precompiles of a dedicated chain are often necessary to maintain performance SLAs that shared L2s cannot guarantee.
Select the modular infrastructure
Choosing a framework determines your chain’s consensus, programming language, and upgrade path. In 2026, the three dominant paths are Cosmos SDK, Polkadot Substrate, and Avalanche Subnets. Each offers distinct trade-offs in developer experience and ecosystem integration.
Cosmos SDK remains the standard for independent L1s. It uses Go and Tendermint BFT consensus, offering robust interoperability via IBC. This stack is ideal if you need a sovereign chain that interacts seamlessly with the broader Cosmos ecosystem.
Polkadot Substrate, built in Rust, offers maximum flexibility. Its modular design allows you to swap consensus and runtime modules easily. If your app requires unique rule sets that don’t fit standard EVM patterns, Substrate provides the deepest customization.
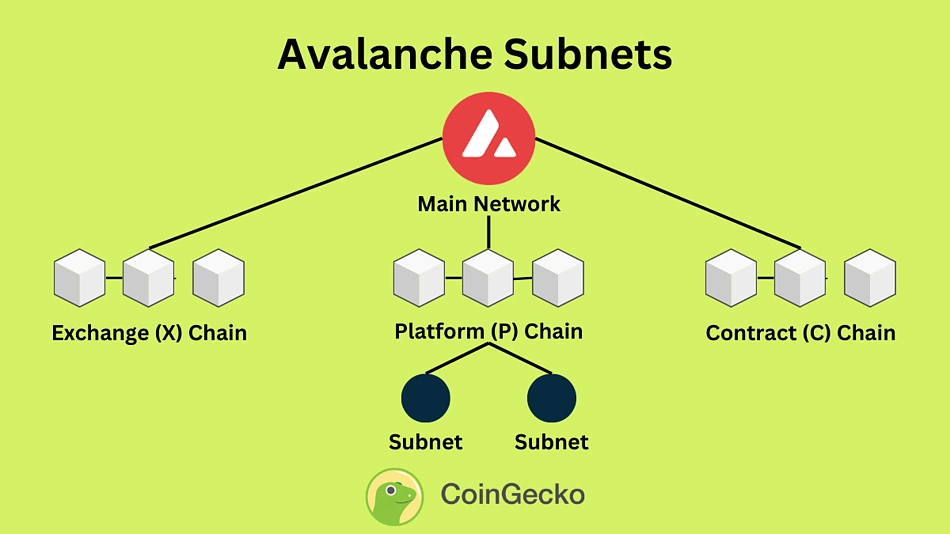
Avalanche Subnets bridge the gap between custom L1s and Ethereum compatibility. They run on Go but support the EVM, allowing you to deploy Solidity smart contracts on your own chain. This is the fastest route for teams already invested in the Ethereum tooling landscape.
Configure consensus and security
Choosing your security model determines how your validator set is managed and how your app chain meets enterprise compliance standards. You must decide between a shared security model, where you rent validity proofs from a larger network, and an independent validator set, where you maintain full control over node operators and consensus rules.
Option A: Shared Security (Rollup-Based)
Shared security allows you to launch an app chain without bootstrapping a large set of independent validators. Instead, your chain’s state transitions are secured by the underlying Layer 1 or Layer 2 network (e.g., Ethereum, Arbitrum, or Celestia). This model is ideal for enterprises prioritizing speed to market and relying on the established security of the base layer.
Pros:
- Lower Barrier to Entry: No need to recruit and stake large amounts of capital from independent validators.
- Inherited Security: Benefits from the economic security and finality of the parent chain.
- Simplified Compliance: Validators are often managed by the infrastructure provider or a small consortium.
Cons:
- Dependency Risk: Your chain’s security is only as strong as the base layer. If the parent chain experiences congestion or protocol changes, your app chain is affected.
- Limited Customization: Consensus mechanisms are constrained by the base layer’s capabilities.
Option B: Independent Validator Set (Native Chain)
An independent validator set means your app chain has its own dedicated block producers. You define the consensus algorithm (e.g., Tendermint BFT, HotStuff) and manage the staking requirements. This approach offers maximum autonomy and is preferred for high-throughput applications requiring specific regulatory controls over node geography or identity.
Pros:
- Full Control: You define consensus parameters, block times, and upgrade processes without waiting for base layer finality.
- Performance: Can be optimized for specific throughput requirements without contention from other networks.
- Compliance Flexibility: Easier to enforce Know Your Customer (KYC) or geographic restrictions on validators.
Cons:
- High Operational Overhead: Requires recruiting, managing, and securing a robust set of validators.
- Cold Start Problem: New chains with small validator sets are vulnerable to sybil attacks or collusion until they build sufficient stake and reputation.
Implementation Steps
- Define Validator Requirements: Determine the minimum stake, geographic distribution, and technical specifications for your nodes.
- Select Consensus Engine: Choose between Tendermint (for fast finality) or other BFT variants based on your latency needs.
- Configure Security Parameters: Set slashing conditions for downtime and malicious behavior if running an independent set.
- Deploy Validator Nodes: Use infrastructure providers like Thirdweb or Ankr to deploy and monitor nodes, ensuring redundancy and high availability.
Code Example: Validator Configuration
Below is a sample configuration for a Tendermint-based app chain, defining the initial validator set and consensus parameters.
{
  "consensus": {
    "timeout_commit": "2s",
    "timeout_propose": "3s",
    "double_sign_check_height": 0
  },
  "validators": [
    {
      "address": "validator1_pubkey",
      "power": 1000000,
      "pub_key": "ed25519_pubkey"
    },
    {
      "address": "validator2_pubkey",
      "power": 1000000,
      "pub_key": "ed25519_pubkey"
    }
  ]
}
Recommendation
For most enterprise use cases in 2026, starting with a shared security model is the prudent choice. It reduces operational risk and allows you to validate your business logic before committing to the heavy lifting of managing an independent validator set. You can always migrate to a native chain later if performance or compliance requirements demand it.
Deploy the chain and integrate
This section covers the execution phase: compiling your custom app chain binary, configuring the genesis state, and launching the node. The goal is to get a deterministic, consensus-ready validator set online and connect your frontend application to the new RPC endpoints.
Compile and configure the genesis block
Before launching, you must compile the chain binary from your modified SDK source (e.g., a custom Cosmos SDK or EVM fork). Once compiled, generate the genesis.json file. This file defines the initial state, including token distributions, governance parameters, and the initial validator set.
Ensure the app_state section in your genesis file accurately reflects your intended tokenomics. If you are using a custom IBC middleware or a specific EVM precompile, verify that the genesis initialization logic correctly registers these modules. A mismatch here will cause the chain to fail during the first block production.
Launch the validator nodes
Deploy your validator nodes to a reliable cloud infrastructure (AWS, GCP, or specialized web3 hosting like Zeeve or QuickNode for managed services). Start the node with the --moniker flag set to your validator name and point it to your local genesis file.
./myappd init <moniker> --chain-id <your-chain-id> --home ~/.myappd
./myappd start --home ~/.myappd
Monitor the logs for Finalized block or Committed state messages. If the node hangs or errors out, check your P2P ports (default 26656) and ensure your firewall allows inbound traffic from other validators in your set. For a robust start, consider using a systemd service to manage the node process and ensure it restarts automatically on failure.
Integrate the frontend application
With the chain live, connect your frontend. You will need the node’s RPC URL and WebSocket endpoint. Use a library like ethers.js (for EVM chains) or cosmjs (for Cosmos SDK chains) to interact with the chain.
- Connect Wallet: Initialize your wallet provider (e.g., MetaMask, Keplr) to sign transactions.
- Fetch State: Query the chain’s state using the RPC URL to display account balances, staking status, or custom module data.
- Send Transactions: Construct and sign transactions to interact with your chain’s smart contracts or custom modules.
Verify the integration by sending a test transaction and confirming it appears in a block explorer. This end-to-end test ensures your frontend can correctly interpret the chain’s state and that your validators are processing transactions as expected.
Build the chain binary from your custom SDK source. Ensure all dependencies are resolved and the binary is optimized for your target environment (Linux/AMD64).

Create the genesis.json file with your token distribution, initial validator set, and module parameters. Validate the JSON structure against your chain’s schema.
Launch your validator nodes using the compiled binary and genesis file. Monitor logs for block production and ensure P2P connectivity is established.

Initialize your frontend with the chain’s RPC URL. Test connection by fetching account balances and sending a small test transaction to verify end-to-end functionality.
Validate Performance and Costs
Before mainnet launch, your custom app chain must prove it can handle your target throughput without breaking the bank. A chain that works in a local testnet often behaves differently under real network load. You need to measure latency, gas stability, and finality times against your specific business requirements.
Start by simulating peak traffic. Use tools like k6 or custom load generators to send transactions that mimic your most common user actions. Monitor the node's resource usage—CPU, memory, and disk I/O—to identify bottlenecks before they impact users. If your chain uses a shared sequencer, verify that it doesn't become a single point of failure or a cost center during high-volume periods.
Next, calculate the cost per transaction. Compare your custom chain's gas fees against Layer-2 solutions like Arbitrum or Base, and against high-throughput chains like Solana. Ensure your fee market design prevents spam while keeping costs predictable for your users. If gas prices fluctuate wildly, implement fee caps or subsidy mechanisms for critical transactions.
Use this checklist to verify your chain is ready for production:
-
Throughput matches or exceeds target TPS under sustained load
-
Average block time remains stable within 5% variance
-
Gas fees are predictable and lower than comparable Layer-2s
-
Finality time meets user experience requirements (e.g., < 2 seconds)
-
Node infrastructure scales horizontally without performance degradation
Common app chain: what to check next
Launching an app chain introduces specific operational and technical hurdles that differ from standard smart contract deployment. Below are answers to the most frequent technical doubts regarding maintenance, interoperability, and developer requirements in 2026.
No comments yet. Be the first to share your thoughts!